外部控制
高中物理有提到过控制电路的几个方法:光敏电阻、压感电阻、按钮、旋转器等等。Arduino也比较类似。
const int analogPin = A0;//the analog input pin attach to
const int ledPin = 9;//the led attach to
int inputValue = 0;//variable to store the value coming from sensor
int outputValue = 0;//variable to store the output value

void setup()
{
}

void loop()
{
inputValue = analogRead(analogPin);//read the value from the sensor
outputValue = map(inputValue,0,1023,0,255);//Convert from 0-1023 proportional to the number of a number of from 0 to 255
analogWrite(ledPin,outputValue);//turn the led on depend on the output value
}
利用外部旋钮控制脉冲宽度,即 PWM(Pulse Width Modulation)
此外还有光敏电阻、按钮等我也做了实验,思路都差不多就不放在这里了。倒是按钮+蜂鸣器可以到后面配合日型管实现秒表和闹钟功能。
LCD显示
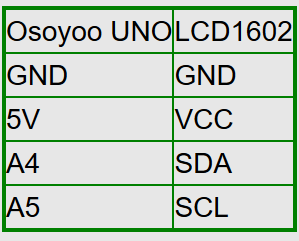
首先把LCD板按图示连到UNO板上,然后UNO板接到电脑,用Arduino先检查I2C地址(通常情况是0x27)。往后代码里涉及到I2C地址的要进行替换以免烧录失败。
/*  ___   ___  ___  _   _  ___   ___   ____ ___  ____
 * / _ \ /___)/ _ \| | | |/ _ \ / _ \ / ___) _ \|    \
 *| |_| |___ | |_| | |_| | |_| | |_| ( (__| |_| | | | |
 * \___/(___/ \___/ \__  |\___/ \___(_)____)___/|_|_|_|
 *                  (____/
 *In this experiment, the sketch will make a connection between
 *Arduino and I2C LCD display and then print a text on two lines.
 *The first line will display “Hello all !” and second the
 *“Welcome to www.osoyoo.com !” message.
 * Tutorial URL http://osoyoo.com/2017/07/09/arduino-lesson-i2c-lcd1602-display/
 * CopyRight www.osoyoo.com
 */
#include <Wire.h>
#include <LiquidCrystal_I2C.h>

char array1[]=" Hello all !                "; //the string to print on the LCD
char array2[]="Welcome to www.osoyoo.com      "; //the string to print on the LCD
int tim = 500; //the value of delay time
// initialize the library with the numbers of the interface pins
LiquidCrystal_I2C lcd(0x27,16,2); // set the LCD address to 0x27 for a 16 chars and 2 line display

void setup()
{
  lcd.init(); //initialize the lcd
  lcd.backlight(); //open the backlight
}

void loop()
{
  lcd.setCursor(15,0); // set the cursor to column 15, line 0
  for (int positionCounter1 = 0; positionCounter1 < 26; positionCounter1++)
  {
    lcd.scrollDisplayLeft(); //Scrolls the contents of the display one space to the left.
    lcd.print(array1[positionCounter1]); // Print a message to the LCD.
    delay(tim); //wait for 250 microseconds
  }
  lcd.clear(); //Clears the LCD screen and positions the cursor in the upper-left  corner.
  lcd.setCursor(15,1); // set the cursor to column 15, line 1
  for (int positionCounter = 0; positionCounter < 26; positionCounter++)
  {
    lcd.scrollDisplayLeft(); //Scrolls the contents of the display one space to the left.
    lcd.print(array2[positionCounter]); // Print a message to the LCD.
    delay(tim); //wait for 250 microseconds
  }
  lcd.clear(); //Clears the LCD screen and positions the cursor in the upper-left corner.
}
对上述代码进行一定修改(是的修改后的代码我又丢了)就得到如下效果。
